Care For Your Soil Structure

Care For Your Soil Structure!
Spring and fall are good times to amend and till your soil to get it ready to plant crops, plants, trees, and bulbs. But tilling at the wrong time can be bad news for your soil.
If the soil is worked when it is too wet or too dry, the soil structure can be destroyed. Always check soil moisture content BEFORE you work the soil.
This can done by performing a rough moisture test by picking up a handful of soil and squeezing it.
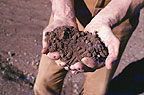 |
Too Dry: If the soil crumbles apart when you open your fingers, it's too dry |
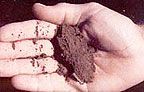 |
Just Right If the soil holds together without packing densely, it's just right. It means the soil is slightly moist, and forms a weak ball with rough surfaces, no water staining on fingers, and a few soil grains break away |
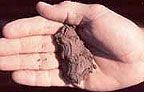 |
Too Wet Wet, forms a ball with well-defined finger marks, light to heavy soil/water coating on fingers, and ribbons between the thumb and forefinger. |
 |
Way Too Wet Wet, forms a soft ball, free water appears briefly on the soil surface after squeezing or shaking, medium to heavy soil/water coating on fingers. |
Once you have established the proper moisture level, now you can till, and the soil will be perfect for you.
Related Post: Soil Nitrogen Content
Soil Tests
Soil tests are used to determine what nutrients are in the soil where you are gardening. All plants need nutrients, but too much of some nutrients is as bad as not enough of them.
A soil test will tell you precisely what is in the soil and what you need to add in order to grow the desired plant in that location.
In order to do the soil test, you first need to collect some soil. Collecting soil from several locations in the garden delivers better results than only collecting it from one location.
The easiest way to do this is to get a bucket and a shovel. Sample five or six places within the garden bed. Each sample should be a shovel of dirt down to a depth of six inches from the soil surface. Place each sample in the bucket.
Mix the dirt in the bucket well and fill the soil test sample bag completely. These bags are available from your Extension agent, generally for free. Next, you need to choose the tests you want to run on your soil.
Generally, the routine tests determine the soil pH, salinity, nitrates, and the levels of phosphorus, potassium, calcium, sodium, and sulfur available to the plants.
Most people will receive all the information they need from this test in order to effectively fertilize their garden.
However, sometimes you want more information. Most soil labs have an extended test available that measures the levels of zinc, iron, manganese, and copper that are available to plants. This test is important for soils with a high pH where plants such as corn or sorghum will be grown.
The rest of the available tests are generally more information than home gardeners need. They test for boron, a detailed salinity panel, lime requirements, and texture and organic matter content.
Such tests are required for some building permits such as a septic system, to detect problems caused by irrigation, or other specialized applications.
When you mail your soil test off to the lab, it takes about two weeks to receive your results. Most labs display the results in a graph that explains the amount of each nutrient tested for and whether it is low, moderate, high, or very high.
It is important when sending off the samples to tell the lab what crops you are growing in the space tested so they know how to calibrate their recommendations for fertilizer.
If you send off several samples at the same time, it is also important to keep a list of which sample goes where. The sample results will come back labeled “sample 1, sample 2, sample 3,…” and guessing which sample goes where is no fun.
The amount of fertilizer you need for each nutrient will be expressed in pounds of nutrient per 1000 square feet, the size of the average front yard. Your Extension office can help you translate that into how much fertilizer you should put in a given area.


Reencle Prime Electric Composter Review: Best Kitchen Composter for 2026


